Using react context to manage state (including TypeScript)
- Chris Wallace
- Tue Dec 31 2019
React context now provides an adequate solution for small-scale state management. In this post I walk you through setting it up in your react application.
When react rewrote their context API back in summer 2018, it brought with it an accessible API for general react developers. Before the rewrite, the react context was considered an API for plugin development only. Fortunately this is no longer the case, and when coupled with react hooks they give us an entry level solution for state management.
Before the react context, react development relied on 3rd party solutions such as redux and mobx for an adequate solution to global state. This is no longer the case with react context and state hooks, and as a first approach it's faster to get a flux based state management solution working with react's out of the box solution. Redux has a lot of moving parts which may not be necessary when starting a new application. In this article I will walk you through the parts required to get a global react state solution setup in TypeScript based react app.
Why global state?
Making domain level or presentation level data available at any point in your application reduces the complexity of the codebase. Similar to injecting dependencies, having a global container holding our state removes the concerns around passing data. In react this is an important asset because react applications are based around complex and deep component trees.
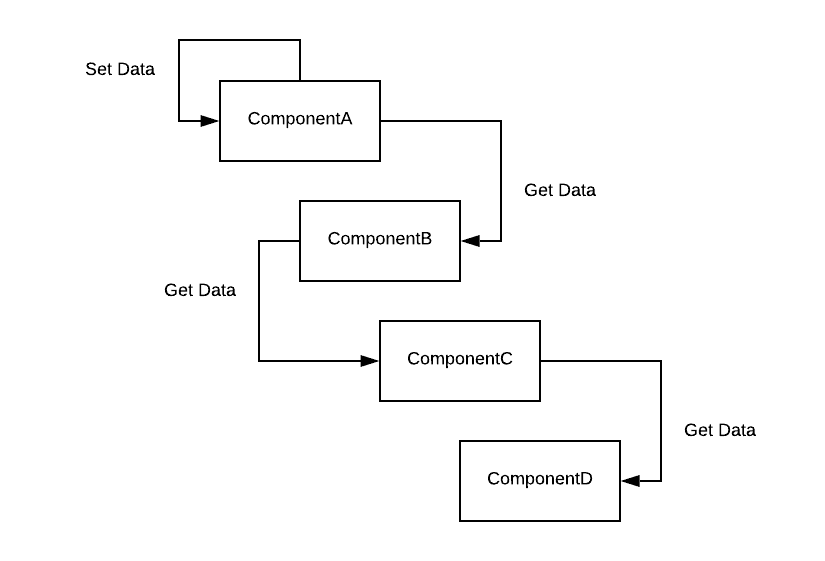
Without connected components, data would have to be passed deeply from parent to child (also known as 'prop drilling'). This is a messy practice and would involve unrelated data being handled within unrelated components.
Rather than having something like this...
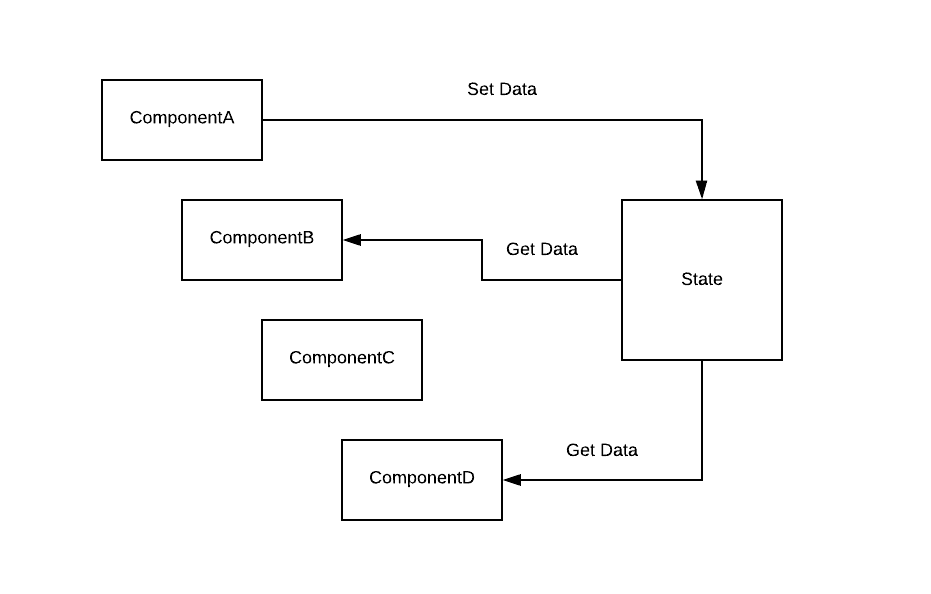
...we can use global state to achieve something like this.
Components at different levels have access to the same data, bypassing unrelated components.
The Structure
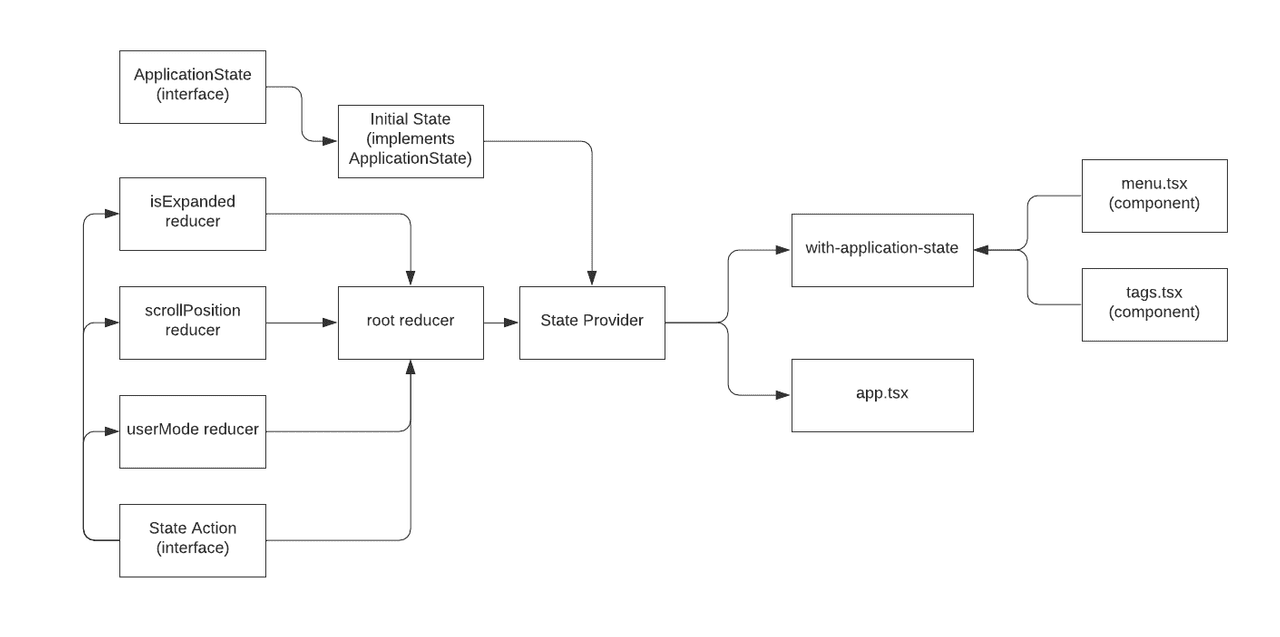
Here's all the typescript modules involved in this solution. Some of these are merely typescript boilerplate to help define the structure of the state and actions we're using, but they'll prove useful when building the state management solution.
- ApplicationState + Initial State
- State Action
- State reducers + root reducer
- State Provider
- with-application-state higher order component
- App.tsx entry
- Consuming components
Let's start with the basics first
Application State + Initial State
| // All the state for the application. | |
| export interface ApplicationState { | |
| isExpanded: boolean; | |
| userMode: string; | |
| scrollPosition: number; | |
| } |
First we define the shape of our application state. In the above example I've created a TypeScript interface describing the properties available within global state. The state has two properties, 'isExpanded', 'userMode'. These two properties are properties specific to the application which could be used across the component tree, there's no specific domain within the app so makes sense for them to be available globally.
Along with the interface, we also have some initial state definitions.
| import { ApplicationState } from './application-state.interface'; | |
| // The default state for the application. | |
| export const InitialState: ApplicationState = { | |
| isExpanded: false, | |
| userMode: 'default', | |
| scrollPosition: 0 | |
| } |
State Action
If you've used redux, you'll be familiar with the dispatcher based pattern used to set state. Even though we're not using redux, we can still apply the same pattern here. To help with defining our dispatcher pattern, we can define a common interface for actions.
| // A generic typescript interface to capture state based actions. | |
| export interface StateAction { | |
| type: string; | |
| payload: any; | |
| } |
Each action is fairly simple, it has a string to define the type, and a payload property for providing values to store in state. Now we need to write some reducers to consume this action interface.
Property level reducers
For each property in the application state, we can define some reducers. Similar to redux reducers, the purpose of these are to handle the dispatched actions and conditionally set values in state.
| import { StateAction } from '../state-action.interface'; | |
| // Exposing the reducer's action types (so we're not passing string literals around). | |
| export const isExpandedActionTypes = { | |
| EXPAND: 'EXPAND', | |
| COLLAPSE: 'COLLAPSE' | |
| } | |
| // Basic reducer to set a boolean state for expand/collapse. | |
| export function isExpandedReducer(state: boolean = false, action: StateAction): boolean { | |
| switch(action.type) { | |
| case isExpandedActionTypes.EXPAND: { | |
| return true; | |
| } | |
| case isExpandedActionTypes.COLLAPSE: { | |
| return false | |
| } | |
| default: | |
| return state; | |
| } | |
| } |
| import { StateAction } from '../state-action.interface'; | |
| // Exposing the reducer's action types (so we're not passing string literals around). | |
| export const userModeActionTypes = { | |
| SET_USER_MODE: 'SET_USER_MODE' | |
| } | |
| // Basic reducer to set a string literal user mode | |
| export function userModeReducer(state: string = 'default', action: StateAction): string { | |
| switch(action.type) { | |
| case userModeActionTypes.SET_USER_MODE: { | |
| return action.payload; | |
| } | |
| default: | |
| return state; | |
| } | |
| } |
Now we have reducers for the properties, we need to combine them.
Root level reducer
The root reducer acts as an entry-point for the state management reducers. We could of course have a single reducer doing 'all the things' but the example approach allows us to extend the root reducer over time and maintain parts of the application state on a smaller scale.
| import { ApplicationState } from './application-state.interface'; | |
| import { StateAction } from './state-action.interface'; | |
| import { isExpandedReducer } from './reducers/is-expanded.reducer'; | |
| import { userModeReducer } from './reducers/user-mode.reducer'; | |
| import scrollPositionReducer from './reducers/scroll-position.reducer'; | |
| // A root-level reducer to capture all dispatched actions within the application | |
| export default function rootReducer(state: ApplicationState, action: StateAction): ApplicationState { | |
| const { isExpanded, userMode, scrollPosition } = state; | |
| return { | |
| isExpanded: isExpandedReducer(isExpanded, action), | |
| userMode: userModeReducer(userMode, action), | |
| scrollPosition: scrollPositionReducer(scrollPosition, action) | |
| } | |
| } |
Now we have a solution to set state, we need an integration point to get state within the application component tree.
State Provider
We now need a state provider component to setup our global state and make it available as part of the component tree.
| import * as React from 'react'; | |
| import { ApplicationState } from './application-state.interface'; | |
| import rootReducer from './root.reducer'; | |
| import { initialState } from './initial-state'; | |
| // Interface to define the basic props for the provider component | |
| interface StateProviderProps { | |
| children: any; | |
| } | |
| // Interface to define to state of the context object. | |
| interface IStateContext { | |
| state: ApplicationState; | |
| dispatch: ({type}:{type:string}) => void; | |
| } | |
| // A basic empty context object. | |
| export const GlobalStore = React.createContext({} as IStateContext); | |
| // An wrapping function to handle thunks (dispatched actions which are wrapped in a function, needed for async callbacks) | |
| const asyncer = (dispatch: any, state: ApplicationState) => (action: any) => | |
| typeof action === 'function' ? action(dispatch, state) : dispatch(action); | |
| // The StateProvider component to provide the global state to all child components | |
| export function StateProvider(props: StateProviderProps) { | |
| const [state, dispatchBase] = React.useReducer(rootReducer, initialState); | |
| const dispatch = React.useCallback(asyncer(dispatchBase, state), []) | |
| return ( | |
| <GlobalStore.Provider value={{ state, dispatch }}> | |
| { props.children } | |
| </GlobalStore.Provider> | |
| ) | |
| } |
We create an interface for the 'IStateContext', then create a 'GlobalStore' object using the 'createContext' API. The State context has an instance of our 'ApplicationState' and a dispatcher, which will then made available throughout our component tree (because it's created using the react context). Finally we encapsulate the store within a 'StateProvider' component (a wrapping component), which assigns an initial value for both the 'state' object and the 'dispatcher'. The initial value for the state use created using the root reducer we defined prior. We now have a Global State object and dispatcher ready to be bootstrapped to our Application
App.tsx
In order to bootstrap the Global State to our app, we simply wrap it around the root of our application. The State Provider component has 'children' props defined by default, so to make the application state ready we need to wrap the root of the application with our provider.
| // Wrap the global state provider around the root of your app. | |
| ReactDOM.render( | |
| <StateProvider> | |
| <App /> | |
| </StateProvider>, | |
| document.getElementById('root') | |
| ); |
Our application has state, but how do our components access that state?
with-application-state Higher Order Component
Using a higher order component, we can make any component at any point in the component tree have access to our global state. If you're unsure what higher order components are, it's worth having a read (checkout my 'resources' page for useful reads). For now, all you need to know is that it wraps a component inside another component and 'sprinkles' on additional prop values.
| import React from 'react'; | |
| import { GlobalStore } from '../../providers/state.provider'; | |
| // A higher order component to inject the state and dispatcher | |
| export default function withApplicationState(Component: any) { | |
| return function WrapperComponent(props: any) { | |
| return ( | |
| <GlobalStore.Consumer> | |
| {context => <Component {...props} state={context.state} dispatch={context.dispatch} />} | |
| </GlobalStore.Consumer> | |
| ); | |
| } | |
| } |
In our example, we leverage the 'Global Store Consumer' object available from the react context to wrap any component. Using the Consumer gives us access to the 'context' object and inject the global 'state' object and 'dispatch' function for our component to consume. So long as the consuming component has awareness of 'state' and 'dispatch', they can be used to get and set state (see the next section for examples). This pattern is also very clean when writing tests, as our consuming component can use stubbed or mocked 'state' and 'dispatch' props as dependencies and not require any knowledge of the context object at all.
Now we've setup a higher order component to connect components to state, how is it used?
Consuming components
Now we have our higher order component to connect components to global state, we can use it with our application's components. Our first usage is for a 'Tags' component.
Our component defines the props required, including the 'state' and 'dispatch' from our global context. Then within our component we use the 'dispatch' function to dispatch a couple of state setting actions (EXPAND and SETUSERMODE). These actions control an expand/collapse menu and the content conditionally rendered inside a menu. Note that we're also using the Action Types defined in our property reducers (so as not to use string literals).
Our second example (a menu component) is more complex but applies the same principles.
Although this component is larger than the Tags component, it follows the same approach. The Menu component defines the props required, including the 'state' and 'dispatch' from our global context. The state object is then used to drive the expand/collapse and conditional rendering behavior of the component. It also has different buttons to dispatch specific actions (controlling the expand/collapse state of the app, and the conditional rendering inside the menu).
With all these pieces in place. We now have two separate components in two separate parts of the component driving common behavior globally in the app.
One driven by the tags...

...and another driven by the menu.

I hope you found this walkthrough useful and has helped you get up and running with global react state. All the example code for this article can be found here.


